
Club Roleplaying and You!
How to start your own roleplay
There are a few things that you should be made aware of before you start your own roleplay. You are already familiar with the four types of clubs that can be made, for varying degrees of privacy for you and your roleplayers.
Club users
Each club has four levels of users. This is one of the reasons why we love the Club system for the public roleplays, as it allows the Club Owner to moderate the content within their own club with limited intervention from Site Staff. This gives the Club Owner a huge amount of autonomy within their own roleplay. They can do as they wish with their club, as long as they’re not breaking the site ToS. The Owner would also be able to appoint their own Administrators and Moderators to help police the roleplay although at this time there cannot be more than one Owner of the club. Club Administrators and Club Moderators are not staff members of the community as a whole, and it is just for the club that they are the Administrator or Moderator of; exceptions are of course actual community staff that are Club Administrators and Club Moderators.
- Club Leader/Owner: A Leader has some of the permissions of a Site Moderator, within their own Club. They do not have these permissions outside of their Club on the main site. They can also appoint Administrators and Moderators within their club, and add content areas. The Club Owner is automatically the Leader of it.
- Administrator: They have the same permission level as the Club Owner, so you must be careful as to who you appoint. They can do everything that a club owner can. So again, be careful who you make an administrator. They help the Owner not only moderate the club, but they can be immensely helpful in helping set up the Club and the content areas to build up the roleplay.
- Moderator: As the name implies, Club Moderators have the ability to moderate content posted within the club on a non-destructive level which can easily be reversed by the Leader or Administrator.
- Members: Any other Dreamer that have joined the club but have no permissions to moderate the area. Above the Public Club, they do have permission to post content within the club.
- Guests/Visitors: People who have not joined the club in question. Private clubs are completely invisible to these Dreamers, and closed clubs show up on the club directory but the content within the club is not visible until they become members. Open clubs are visible, but cannot be posted in by a Guest of Visitor. Public clubs don’t require joining in order to post in.
The ability for a Club to have their very own Administrators and Moderators, is a fantastic feature especially for large roleplays that have a large amount of Dreamers that get involved. It would help the Leader keep the club running smoothly and cuts down on the amount of work that the Leader has to do to moderate their own club.
Permissions
This is the current permission sets with the clubs, that the Leader, Admins and Moderators may have. If any of them change, then this guide will be updated to reflect them:
| Permissions | Club Moderators | Club Administrators | Club Owners |
|
Pin Content This makes a topic within the club appear at the top of the topic listings, much like how pinning content works on the Forums. |

|
|
|
|
Unpin Content This demotes a topic within the club from appearing at the top of the topic listings. The topic will be listed normally when unpinned. |
|
|
|
|
Hide Content Hiding content hides a post, image or topic (for example) from appearing to other club members. |
|
|
|
|
View Hidden Content Allows your club staff to see hidden content. To help stand out to club staff, the hidden content will appear highlighted in red. |
|
|
|
|
Lock Content Locked content cannot be replied in by your club members, which is great for setting rules and such. It also allows topics that are finished to be locked, as an archiving tool. |
|
|
|
|
Unlock Content The ability to unlock content that was previously locked. Not usually needed unless there is an event that opens on specific days for example. |
|
|
|
|
Reply to Locked Content Allows your club staff to reply to content that is already locked, useful because it means you don't have to unlock it, reply and then lock it. |
|
|
|
|
Add Features to Club Adding features to the club such as a calendar, topics page, gallery, and so on. |

|
|
|
|
Edit Categories/Features Editing already existing features on the club like a Gallery Page, Topics Page and so on. |
|
|
|
|
Can Promote Members to Administrators/Moderators Self explanitary; this is the permission sets who can make people staff. |
|
|
|
|
Invite Dreamers to Club (Closed/Private) Usually for Closed and Private Clubs; allows your staff to invite Dreamers from the community to your club and/or roleplay. |
|
|
|
|
Remove Members From Club The ability to remove members from the club; this could be for a whole host of reasons, and if your club is open (Not Private/Closed) nothing stops the Dreamer from rejoining. |
|
|
|
|
Edit Content *Potentially Destructive* Editing other people's posts, images and so on that other people have posted. If you edit a post it will come up at the end of the post that it was edited by you. |
|
|
|
|
Move Content *Potentially Destructive* The ability to be able to move content within clubs they are a moderator/administrator or owner of. This is disabled across the board. |
|
|
|
|
Unhide Content This is disabled due to technical limitations. Please consult a member of the Community staff to have content unhidden for you, please be clear as to what you want unhiding (by posting a link to it). |
|
|
|
|
Delete Content *Destructive* The ability to permanently delete people's content. This is disabled across the board, if you want something deleted please speak to a member of the Community staff. |
|
|
|
|
Split and Merge Content *Potentially Destructive* If you have posts for example that are posted one after the other by the same person you can merge them, this requires the ability to edit content. For the meantime this is disabled. |
|
|
|
Starting a club Roleplay

|
Now that the nitty and gritty things are out of the way, now it is time to learn how to actually create a Club. The first thing that you’re going to need to do, is to look at the very top of EcchiDreams to where the “Explore” menu is. Hover over the menu items, and you’re greeted with this menu:
Once the menu is open like in the picture to the side you’ll see a list of menu items. If you click on “Clubs”, it will take you straight to the Club Directory. This is where you can see all of the clubs that are available, and visible to you, some are roleplay clubs, some aren’t. You can filter these results once you’re inside of the Clubs section by using the “Filter” button. There may be some that aren’t visible, but unless you are a member of these clubs, they will remain hidden from you.
|
In the top right hand corner, there should be a nice big button labelled “Start a Club” which is what you need to click on to start up your own Club. As soon as you click on it, you’ll be greeted with the club creation screen:

As you can see, I have already filled in information regarding the club. These can be changed later with your new, shiny Owner permissions. As you can see, I have added a brief description. I deliberately put the skill level of the roleplay at the very beginning so that it is clearly visible to those that have yet to join so that they know that there is some minimum requirements to be able to roleplay within it.
For now, I have set the RP to ‘Private’ because I am still setting it up and I don’t want people to see anything until I am ready for them to do so. The privacy setting can, again, be changed after you’re happy that everything is ready. I have not bothered to put in a Club Icon, just yet. I’ll show you why in a bit.
I’ve selected the type of Club that it is going to be, a ‘Roleplay Club’ so that it can be easily filterable by the clubs that are roleplay specific clubs. As you can see in the very bottom, there is a list of automatically created features. By default, they are all ticked which will start you off with one forum and one image category. Once you’re happy, click on “Save” and it will create your new club.
At first, this is what greets me;

It’s very plain and bland, with nothing going on. The perfect blank canvas. As you can see, it has created the gallery (Images) and forum (Topics) categories that it asked about when creating the club. These can be renamed later. For now, I am going to set up the club icon and the banner image.
The reason why I didn’t set up the club image, when creating the club, is that doing it there doesn’t allow you to crop the image the way you like. If you leave it alone, and add the club icon after creating the club then you’re able to do this edit. Not only that, but uploading the image can cause it to become blurred and unattractive. The image I picked for my icon was quite large, thus I had to crop it down and make the image smaller so that it would fit for the icon, and look good. In the left corner of the icon, you should see a small grey image icon. Click on this, and it will bring up the image uploading window. When you’ve uploaded the picture you want to use for the icon, you will be greeted by the window below:

As you can see, the crop itself is slightly away from the edge. For mine, I just made it fill the entire image and then selected save. Now my club has an icon!
Now that we’ve got a club icon, let’s pick out a cover image. I have an image already, a lovely landscape picture with a cherry tree, some mountains and even a small building in the background that is scarcely visible. In much the same way as you change the cover image in your profile, click on the ‘Photo’ button which will bring up the window that allows you to upload an image. Once you have done that you are able to reposition the image to your liking. Once it is done, click on the “Save position” button and you’re done!

Now, with both an icon and a background image, it looks beautiful! My icon contrasts with the cover image, making it stand out instead of just blending into the cover image and not being very visible to the members.

Roleplay Content
Now that we have an icon and a cover image we need to look at adding content to our roleplay so that Dreamers can join it, and immediately get stuck into some good roleplay action. You might have noticed that in almost all of the screenshots that have been showed, there is a button on the right hand side of the screen, above the small member bar, called “Manage Club.”
When you click on it, we are greeted with this menu:

From this menu, we can do a lot to really make our roleplay become alive. From here, you can edit almost every aspect of the club:
Club Settings
The Edit Club Settings option allows you to edit the settings of the main club, including the name, icon, description and the type of club. This can only be done by the Owner of the club, giving them sole control over their club although the EcchiDreams staff do have staff powers that grant them the ability to edit a Dreamers club as mentioned in the permissions. They generally won’t do this without permission, unless a violation of the ToS has occurred.

Invite Members

This is where you can invite specific Dreamers to come and join your club. This is especially useful for getting members to join a private club which is otherwise invisible to them. The form has an auto complete feature so if you type out the first three characters of a Dreamers username it will show a list of dreamers with that username, if the Dreamer you’re looking for is in the list you can click on it and it’ll fill out the rest. The more characters you put in the more it hones in on the search and you can repeat this as necessary to invite the multiple Dreamers you want to invite to the club. Once a Dreamer has been invited, it will send them a notification that lets them know that they have been invited. When they click on it, it leads then to this screen. To join, all they need to do is click the green button, and they are now fully members of your club!

Home Page
The Home Page is not something that is active by default. It is where you, as the Club Owner, can put information about your roleplay. As this is the first thing that Dreamers will see when they enter your club, it would be best to make this page as attractive as possible to entice Dreamers into being interested in joining.
To activate the Home Page, bring up the Manage Club menu and click on the Home Page option. When you do, you are greeted by this:

If you click the greyed out slider button, then the menu will change into this:

You now have access to a Text Editor, much like what you get when you are posting in the main forum. In this text editor, you can change the font style, colour, size and other formatting such as bolding, underlining, alignment as well as being able to put images into the post. All of these features can be utilised to create a very attractive Home Page. I have made a small mock-up below, although it will not be my final Homepage. It’s purpose is to show you what an example Homepage might be like. For a more in-depth guide on how to make an attractive home page, click here.

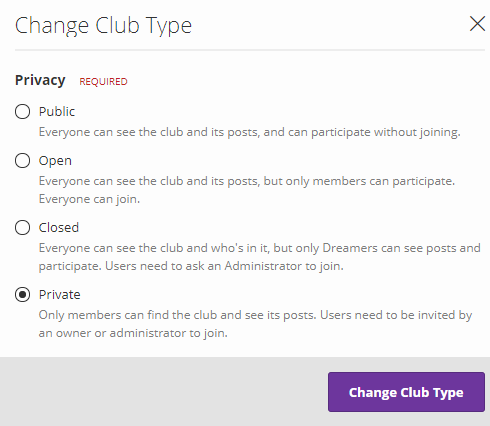
Change Type
Despite the fact that you can change your Club from a General Interests Club into a Roleplaying club in the Club Settings menu, this is not the same Club Type. This is more the privacy setting of the club. From this menu, you can change it to one of the four types; Public, Open, Closed and Private.
Manage Features
This is where you can disable or delete any of the Club features that you have implemented. When you click on this button, you are greeted by this box:
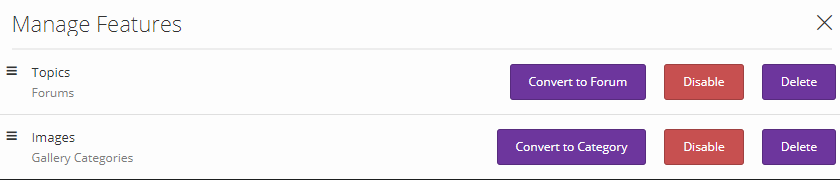
At the moment, you cannot use the Convert to Forum, or the Convert to Category as that requires Site Staff permissions. All it does is allow you to move the threads within the topics forum, into the main EcchiDreams forum.
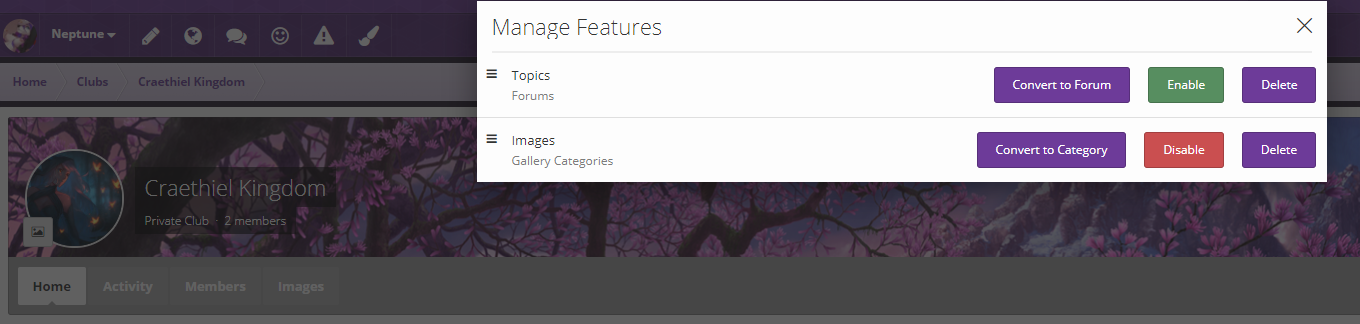
However, you are still able to disable or delete features. When you disable a feature, it causes it to disappear from the feature menu that you see below the cover image. If you simply disable a feature, then it can be re-enabled in the Manage Features menu:
If you delete a feature, however, it will be permanently removed. When you delete a feature, a dialogue box will appear asking if you’re sure. This is so that you do not accidentally remove a feature that you didn’t intend to. If you are absolutely sure that this is what you want to remove, then click on “OK”. If not, select “Cancel”.
If you go ahead with the deletion of this feature, you will be greeted with this page:

You can continue at this point, and delete any of the content within that feature such as topics and images. These will be forever lost to you so if you have anything important, it would not be a wise idea to do this arbitrarily. The Community Staff may not even be able to restore content you’ve deleted so again - be absolutely sure you want to do this.
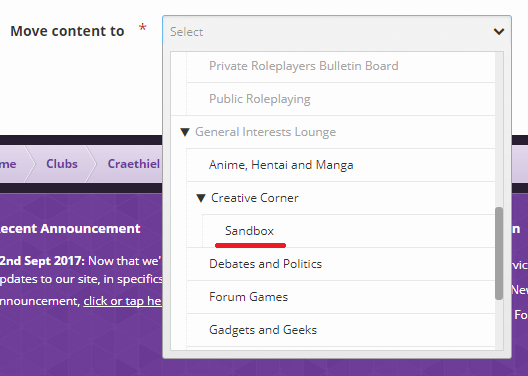
If there is indeed content that you wish to save in the feature, you do have the power to move it somewhere else. Uncheck the “Delete Content” box, and it will allow you to navigate the “Move content to” drop down menu. When you do this, we suggest moving the content to your Sandbox Forum so that it is hidden from view and it doesn’t conflict with any other forum on the site. No other Dreamer, other than the staff, can see what people post in your Sandbox forum unless you’re the topic creator. Thus it is perfect to hold ‘removed’ content from a club because you can still see it, and you can still utilise it. Bear in mind that once you have moved it, you cannot move it somewhere else without the help of staff.
Adding a Club Feature: Topics
As you can see from the drop down menu, the top two options is to add new features to your Club. Topics, and Images. This is a fairly simple process, and will add a new tab to the list that sits underneath the cover image.
The Topics Feature is the in-club forums, where you and the members of your club can post topics, and interact with other members of your club. When you click to create a new Topics tab, you are greeted by this screen:
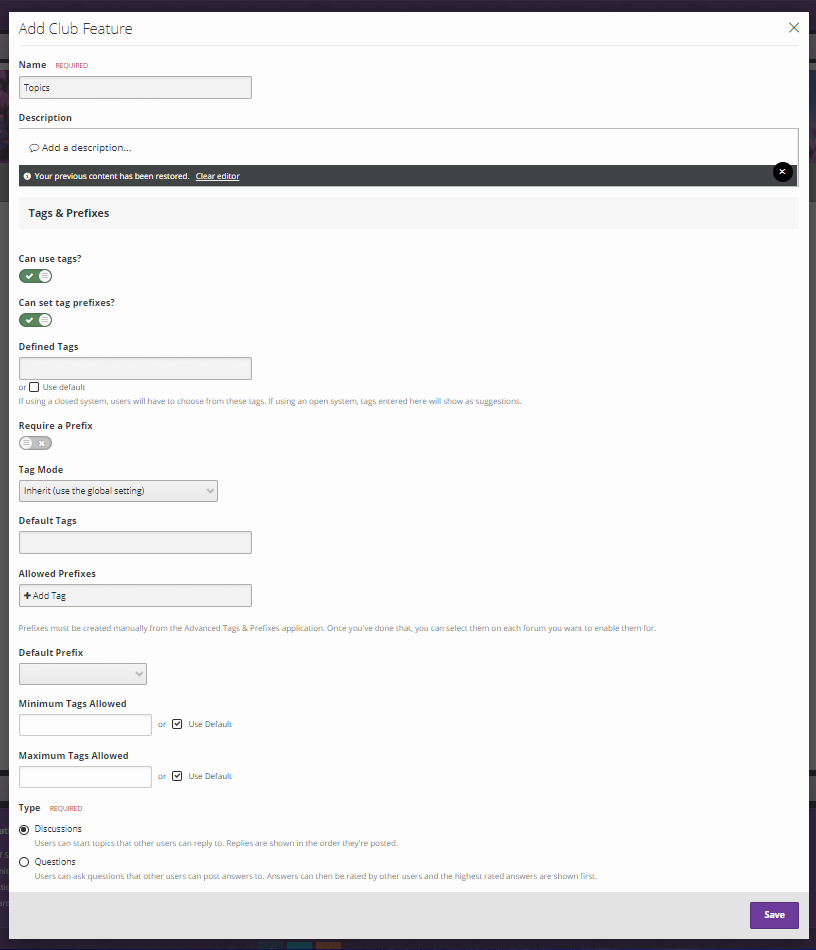
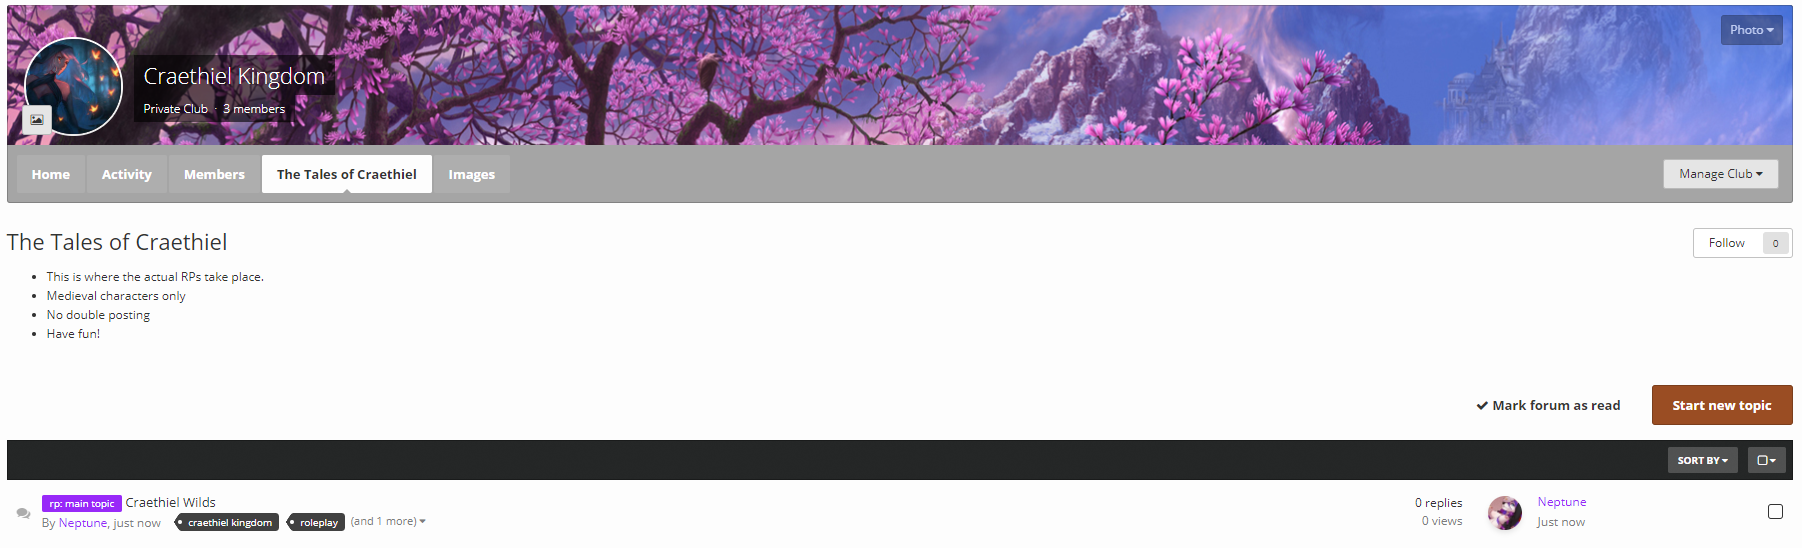
As you can see in the top you can decide the name of the tab. If it is where you are holding your Roleplaying topics, you could name it “Roleplaying Topics” or even something a little fancier like “The Tales of Craethiel” although that is quite wordy. The description allows you to display information about that tab, and what it is for. If we keep to the roleplaying topics example, you could put the in-game rules of the roleplay. For example, stating that characters can only be human. Or that you only want wizard and witch characters. You can also use the description to describe to the members of your club how to use the tab. For example, if you are wanting everyone to use the main prefix of ‘Side Story’ when they are doing a side story, then this would be the perfect place to do it. It is basically the introduction to this section of your club. Use it well.
The next part of the form deals with tags, and tag prefixes. The tags are part of a system on EcchiDreams which makes it easier to search for similar content. For example, if you tag all of your roleplay content with ‘roleplaying’, if another dreamer were to search for content containing the tags ‘roleplaying’, your content would appear to them providing that your club isn’t private, or closed. A prefix is a tag that appears beside the title of your topic, which makes that particular tag stand out. This can be used to immediately identify a certain topic, with a certain tag such as ‘side story’ so that your members know that, that topic could contain some very saucy material.
Due to the amount of power that you as the owner has over the club, this is about to get rather complicated.
The first part of the tag forms gives you two slider buttons:
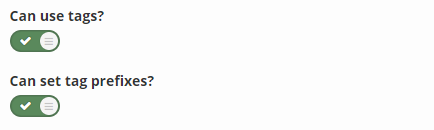
If both of these are in the ‘on’ position like above, then this will allow the members of your club to use tags, as well as prefixes. In the off position, your club members will not be able to use tags, or prefixes. That’s simple enough, right?
This is where things begin getting more complicated. For the moment, I will skip over the defined tags as we need to explain the tag modes, first. Underneath the option to make it so that topics within this forum require a prefix, you will see a drop down menu;
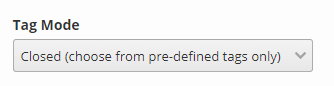
There are four options within this drop down menu:
- Inherit: Members within your club can apply whatever tags they wish. This is the default tag mode of most of EcchiDreams.
- Open: Members can do tags themselves, but defined tags will be given as suggestions of which they can pick from. These suggestions appear when you start typing in the tag box.
- Closed: Member must choose from a selection of tags that is outlined in the Defined Tags.
- Prefixes only: Member cannot tag and will have to select from a list of prefix options.
Now that I have explained what the tag modes are, we can move onto the other tag options which can be used in conjunction with tag modes to allow you full control over the tag system within your club.
Define Tags

As you can see with the small text, these defined tags will appear as options within a Closed tag system. Members cannot input their own, and must choose from these options. With an Open tag system, these defined tags will appear as suggestions which the member can select from but it doesn’t limit them to just those options.
As I mentioned earlier, underneath the defined tags field, you have an option that forces a requirement for every thread to have a prefix. This is self explanatory, as it forced the members of your club to assign a prefix to any thread that they are creating.
Default Tags
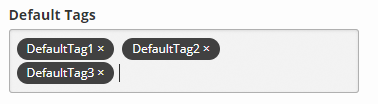
You, as the Owner or Admin of the Club, have the power to set up default tags. With the exception of the ‘Prefixes Only’ tag mode, it will force these tags onto every thread. With the Open tag system, the default tags will appear in the tag field. The defined tags will still appear as suggestions when you type in the tag field. In the Closed tag system, again the default tags will appear in the tag field with the option to add more tags from the list that you have set out.
Allowed Prefixes
These are selected from a list of prefixes that have been set by the site staff. This adds a drop down menu to the thread creation page, with a list of prefixes for the members of your club to choose from.

In order to add a new one to the list, select “+ Add Tag” and scroll through the list to find the one you want to add:

At the moment there are four of these tags, to use for your purposes:
- Main topic: To highlight the main thread of your roleplay.
- Extra information: To indicate a thread that details out additional information regarding the roleplay.
- OOC: This tag means Out of Character, for use for threads where Dreamers can interact with each other without disrupting the flow of the Roleplay.
- Side Story: This tag indicates a side story, which is loosely attached to the main roleplay thread but involves a separate adventure, or a sex scene, which would disrupt the main flow of the roleplay.
If you have any suggestions of other tags to add, please don’t hesitate to contact a member of the Community Administrative staff although we would only add tags that would be used on a regular occasions across numerous clubs. These tags are likely tags that will be used commonly, and have been grouped together in the drop down menu for ease of selection. The other tags that can be seen, are not suitable for the club roleplay.
In the next field, it is possible to set a Default Prefix that will appear for each and every thread inside of that forum:

For example, if you create a forum which is completely dedicated to Extra Information, you could force every thread to have ‘Extra Information’ as the prefix. Honestly, doing this is a little pointless if every threat in the forum is dedication to the extra information. It would be better to let members add a prefix of something more appropriate to do with their thread. For example, if they’ve created a species profile, they could add the prefix of ‘Species’ which will immediately identify what is in that thread.
Tags Allowed

The next two fields deal with the maximum and minimum of tags that can be used by the members of the club. The site default is twenty five tags. You can change it to include as many, or as little as you like. Try to be realistic about it. It’s very rare that someone has been able to use up twenty-five tags in a single forum thread. Although keep note that even if you were to set a minimum amount of tags, if a member tags their thread with a number of tags under your minimum limit, it will still post.
Forum Type
The very last option gives you two choices:

The Discussions type is the type that is primarily seen in the rest of the forum where you have a list of topics where Dreamers can post and interact with one another. This is the forum type that is usually utilised for the actual Roleplaying threads.
Questions, on the other hand, allow members within your club to ask the club community a question. Other members will be able to respond back to the original question, and the community can vote on which answer is the best. Or, the Owner can mark the best answer to the question.
Your members can also set up a poll, for other members to answer. When starting a new topic within a Questions forum, there are two tabs:

As you can see, you have your standard title, tags and text editor which will allow you to format your question however you wish. Even if you set up a poll, the post will still appear underneath it so it allows you to explain your poll to other members of the club.
If you select the tab ‘Poll’, you are greeted with this content creation page:

Select the ‘Add Question’ button, and you can add in a new question:

This will add a poll to your question, which other members can participate in. You can even make it a multiple choice question, and allow members to select from the numerous choices that you have put up. You can also either hide the information of who votes in your poll, or make them public. You can also add an option to automatically close a poll after a certain amount of time. For example, keeping it open for just a week. You don’t have to add just a single question, either. You can add multiple questions to one poll.
The Questions format can be very useful to set up as a feedback system to your roleplays. If roleplayers are having problems, and want to ask others for help then they can post up a question detailing their problem. It would also allow the Game Master to ask the roleplayers questions about events that occur in the roleplay, and get feedback from them.
Once you have finished setting up everything to your liking in the window for making a new forums tab, click ‘save’ and it will take you back to the home page, or the activity page if you have no home page. You will notice that there is a new Topics tab which is named whatever you called it. You are able to easily edit it, by going to that tab and clicking on ‘Manage Club’ and selecting ‘Edit this forum’. Here you can edit all the settings that you were given when adding in that new feature.
Adding a Club Feature: Images

Again, you can title this new tab whatever you wish. If you are using it as Character ID, you could call it ‘Character IDs’ and leave it as if. Underneath the title, you have a description box. Like with the Forum, you can use this to detail out what images are to be added to this category. For example, if you’re using this tab for your Character IDs, then you can put in your Character ID template which the members of your club have to fill out to be able to get involved with your roleplay.
Underneath the description box, there are three options that you can either keep enabled, or disable them.
- Allow Albums: This allows the members of your clubs to create albums within the image category. This is very useful in separating images up per member, and allows members to keep their characters all in one place. This prevents things from getting too cluttered.
- Allow Comments: This allows members to comment on images within the category like one is able to do in the main EcchiDreams gallery.
- Allow Reviews: This allows members to review the images posted up. By default, this is disabled, but you can enable it so that members can, for example, review characters that are posted up.
Once you have selected what you wanted, you can go ahead and click on the purple save button. Like with the forum, it will send you back to the home page, or the activity page and you will be able to see you new images category in your tab list. Like before, if you wish to edit any of the settings of that particular tab, select it before clicking on ‘Manage club’ and select ‘edit this category’ which will allow you to edit its settings.
When the new image category is up, this is what it would look like:

The images will appear at the bottom of the description:

As you can see, I have my own Character Album which will contain all of my main characters.
The images tab is fantastic for use with your Character IDs. The description of each image allows you to place in a Character ID sheet. It allows you to keep things neat and organised. If a character has multiple images, then they can be posted up and linked to the main Character ID profile.
Finishing Touches
Now you’re aware as to how to add new features to your club, and how to use the options available, you should be able to set up and begin running your own roleplay. How you set it out, is completely up to you. There are no rules as to its format, or any minimum requirements for a roleplay. The ball is entirely in your caught.
If you’re still unsure as to what kind of roleplay you want to do, or how design one, I recommend the following guides:
- Roleplay Clubs - The Game Master’s Guide
- How to develop a large, engaging plot
- How to make an attractive Home Page
Tips
Follow the content within your club! This will allow you to be alerted to when people post new images, new threads and reply to topics within your roleplay. It helps you keep on top of everything, and to deal with any situations that arise.

You can also follow each and every thread, so that when new replies are added to it you are notified:

Whenever you do a new post, whether in your own thread or in a thread created by someone else, you will have the option to follow the thread. By default, the slider button is greyed out unless you’ve activated the option to automatically follow content you post to automatically in your main account. To activate it, click the button until it’s in the green ‘on’ position.
